###############################################################################
#
# Steganography Online Codec WebApi interface usage example.
#
# This example shows how to hide an encrypted secret message in an image file.
#
# Version      : v1.00
# Language     : Python
# Author       : Bartosz Wójcik
# Project      : https://www.pelock.com/products/steganography-online-codec
# Homepage     : https://www.pelock.com
#
###############################################################################

#
# include Steganography Online Codec module
#
from steganography_online_codec import *

#
# create Steganography Online Codec class instance (we are using our activation key)
#
mySteganographyOnlineCodec = SteganographyOnlineCodec("YOUR-CODE-GOES-HERE")

#
# encode a hidden message (encrypted with your password) within an image file
#
result = mySteganographyOnlineCodec.encode("input_file.jpg", "Secret message", "Pa$$word", "output_file_with_hidden_secret_message.png")

#
# result[] array holds the encoding results as well as other information
#
if result and "error" in result:
    if result["error"] == Errors.SUCCESS:
        print(f'Secret messaged encoded and saved to the output PNG file.')
    else:
        print(f'Error code {result["error"]}')
else:
    print("Something unexpected happen while trying to encode the message.")
Zgłosił się do mnie klient z projektem, którego celem było dojście do tego, czy w danym obrazku nie znajdują się ukryte informacje zakodowane poprzez steganografię.
Poniżej prezentuję skrypt w Pythonie, który wyciąga piksele w trybach horyzontalnych (czyli piksel po pikselu na wysokość obrazka) i wertykalnych z grafiki:
najmniej znaczące bity w składowych R
najmniej znaczące bity w składowych G
najmniej znaczące bity w składowych B
najmniej znaczące bity w składowych ALPHA
kombinowane najmniej znaczące bity w RGB
kombinowane najmniej znaczące bity w BGR
kombinowane najmniej znaczące bity w RGBA
kombinowane najmniej znaczące bity w ABGR
Są to najczęściej stosowane metody używane przez narzędzia do steganografii do ukrywania rozbitych danych w najmniej znaczących bitach składowych kolorów RGB.
Kalkulator Kodów Do Radia samochodowego to usługa Web API umożliwiająca generowanie kodów odblokowujących radioodtwarzacze i nawigację w samochodach. Jest dostępna poprzez prosty interfejs online oraz API i wiele bibliotek SDK dla popularnych języków programowania, takich jak np. Python.
Prościej się chyba nie da, obsługa wszelkich możliwych wyjątków:
#!/usr/bin/env python

###############################################################################
#
# Radio Code Calculator API - WebApi interface usage example
#
# In this example, we will demonstrate how to generate a code for a specific
# type of car radio.
#
# Version        : v1.00
# Language       : Python
# Author         : Bartosz Wójcik
# Project        : https://www.pelock.com/products/radio-code-calculator
# Homepage       : https://www.pelock.com
#
###############################################################################

#
# include Radio Code Calculator API module
#
from radio_code_calculator import *

#
# create Radio Code Calculator API class instance (we are using our activation key)
#
myRadioCodeCalculator = RadioCodeCalculator("ABCD-ABCD-ABCD-ABCD")

#
# generate radio code (using Web API)
#
error, result = myRadioCodeCalculator.calc(RadioModels.FORD_M_SERIES, "123456")

if error == RadioErrors.SUCCESS:
    print(f'Radio code is {result["code"]}')
elif error == RadioErrors.INVALID_RADIO_MODEL:
    print("Invalid radio model (not supported)")
elif error == RadioErrors.INVALID_SERIAL_LENGTH:
    print(f'Invalid serial number length (expected {result["serialMaxLen"]} characters)')
elif error == RadioErrors.INVALID_SERIAL_PATTERN:
    print(f'Invalid serial number regular expression pattern (expected {result["serialRegexPattern"]["python"]} regex pattern)')
elif error == RadioErrors.INVALID_SERIAL_NOT_SUPPORTED:
    print("This serial number is not supported")
elif error == RadioErrors.INVALID_EXTRA_LENGTH:
    print(f'Invalid extra data length (expected {result["extraMaxLen"]} characters)')
elif error == RadioErrors.INVALID_EXTRA_PATTERN:
    print(f'Invalid extra data regular expression pattern (expected {result["extraRegexPattern"]["python"]} regex pattern)')
elif error == RadioErrors.INVALID_INPUT:
    print("Invalid input data")
elif error == RadioErrors.INVALID_COMMAND:
    print("Invalid command sent to the Web API interface")
elif error == RadioErrors.INVALID_LICENSE:
    print("Invalid license key")
elif error == RadioErrors.ERROR_CONNECTION:
    print("Something unexpected happen while trying to login to the service.")
else:
    print(f'Unknown error {error}')
Dzięki temu rozwiązaniu możesz tworzyć aplikacje mobilne lub internetowe umożliwiające łatwe generowanie kodów radia i samemu zarabiać na generowaniu kodów radiowych. Przykładowej projekcje zarobków w zależności od cen na stronie projektu.
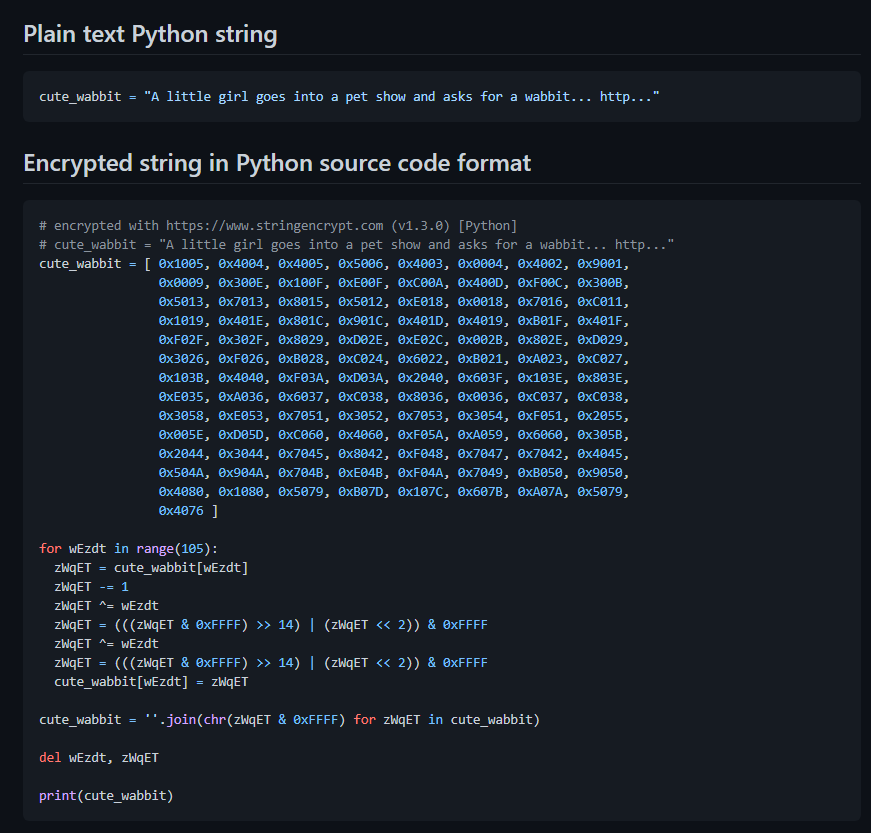
Instalacja dla Pythona z wykorzystaniem menedżera paczek pip:
pip install stringencrypt
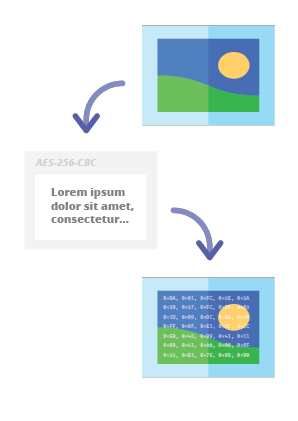
Jak to działa i co to właściwie robi?
W skrócie bierze dowolny string lub zawartość binarnego pliku, szyfruje to silnik polimorficzny i generuje kod w wybranym języku programowania (w tym wypadku w Pythonie) z kodem zawierającym zaszyfrowany string oraz kodem samego dekryptora:
Wydałem właśnie moduł Pythona dla mojego AutoIt Obfuscatora, pozwalający zautomatyzować zabezpieczanie skryptów AutoIt bezpośrednio z poziomu Pythona 3.
#!/usr/bin/env python

###############################################################################
#
# AutoIt Obfuscator WebApi interface usage example.
#
# In this example we will obfuscate sample source with default options.
#
# Version        : v1.0
# Language       : Python
# Author         : Bartosz Wójcik
# Web page       : https://www.pelock.com
#
###############################################################################

#
# include AutoIt Obfuscator module
#
from autoitobfuscator import AutoItObfuscator

#
# if you don't want to use Python module, you can import directly from the file
#
#from pelock.autoitobfuscator import AutoItObfuscator

#
# create AutoIt Obfuscator class instance (we are using our activation key)
#
myAutoItObfuscator = AutoItObfuscator("ABCD-ABCD-ABCD-ABCD")

#
# source code in AutoIt v3 format
#
scriptSourceCode = 'ConsoleWrite("Hello World")'

#
# by default all options are enabled, both helper random numbers
# generation & obfuscation strategies, so we can just simply call:
#
result = myAutoItObfuscator.obfuscate_script_source(scriptSourceCode)

#
# it's also possible to pass script path instead of a string with the source e.g.
#
# result = myAutoItObfuscator.obfuscate_script_file("/path/to/script/source.au3")

#
# result[] array holds the obfuscation results as well as other information
#
# result["error"]         - error code
# result["output"]        - obfuscated code
# result["demo"]          - was it used in demo mode (invalid or empty activation key was used)
# result["credits_left"]  - usage credits left after this operation
# result["credits_total"] - total number of credits for this activation code
# result["expired"]       - if this was the last usage credit for the activation key it will be set to True
#
if result and "error" in result:

    # display obfuscated code
    if result["error"] == AutoItObfuscator.ERROR_SUCCESS:

        # format output code for HTML display
        print(result["output"])

    else:
        print(f'An error occurred, error code: {result["error"]}')

else:
    print("Something unexpected happen while trying to obfuscate the code.")